![]()
This guide will help you start your adventure on your Hytale Server.
Running a Hytale server isn’t just about hosting it’s about shaping the experience for you and your community. Configuring your server settings gives you control over gameplay rules, performance options, and player permissions, ensuring that your world runs smoothly and matches the style of play you want to encourage. Whether you’re setting up a private server for friends or managing a large community hub, learning how to adjust your server settings is the first step toward creating a customized environment. From tweaking difficulty levels and enabling mods to managing player slots and performance optimization, proper configuration makes all the difference in how enjoyable and stable your server will be. By learning how to configure your server settings, you gain full control over the Hytale experience. It’s the foundation for building a stable, engaging, and personalized world where you and your community can thrive.
Configuring Server Settings on your Hytale Server
1. Log in to your Game Control Panel and navigate to your service.
2. Before making any modifications, stop the server from running by clicking the Stop button.

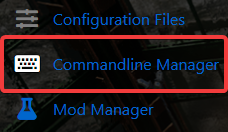
3. Navigate to either Configuration Files Tab or Commandline Manager Tab.
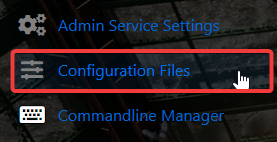
4. On the Configuration Files, To adjust your server settings, click the Config Editor button. This will open a pop‑up window where you can easily modify key options such as the server name, password, and other basic configurations without needing to edit files manually. For advanced customization, you can switch to the Text Editor, which allows you to directly edit the configuration file contents and fine‑tune settings beyond the standard options.

5. For the Commandline Manager, To configure your server, start by selecting the command line you want to activate. Most control panels provide at least two options a default line and a modded line.
Click Modify on your chosen command line to access editable settings such as the server name and password.
You’ll also find options to specify which mods and configuration files should load when the server starts.

6. After making your changes, scroll down and click Apply to save and activate the updated settings.

